How To optimize Images For Web
Optimizing our images for the web became so simple.
A few years ago I found a tool that revolutionized my workflow and was to this date the best 49.00 I ever spent! This tool is the one and only Blogstomp. If you are a photographer and use this tool then you totally get it. You understand how much time and energy this amazing feature saves you. However, if you are a photographer and do not have BlogStomp or have never heard of it, hopefully I can convince you!
Before we stumbled upon Blogstomp we were resizing our images in Photoshop. Trying to build collages and get the correct sizes were a nightmare and we never seemed to get it right. Blogging was even more of a chore and updating our website became a quick nightmare! We just couldn’t get it right and we were always frustrated with the system we had.
When you find a good thing, you should share it!
I am not sure where I found out about Blogstomp, but I believe it was through somebody who shared it. Whoever it was I am so glad they did! After watching the video I couldn’t pull out my debit card fast enough! Seriously if your on the fence about this product… Just do it!
How To Use Blogstomp to optimize your images
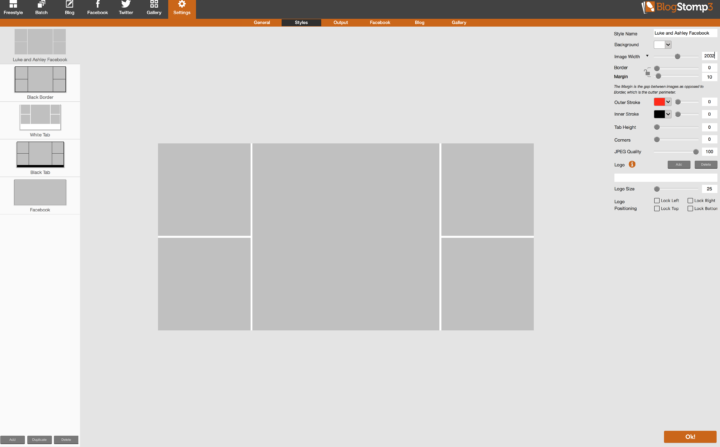
- Set up Your Styles – Blogstomp gives you styles that you can customize for whatever platform you are using your images. You can have a style for your website, blog, Facebook, and more! Go to your settings Tab-Style Name-Customize your Style by putting in dimensions, borders, tab height, watermark and more. If your setting up a style for Facebook, their recommended size is 2048 pixels wide. You can use this style anytime you are posting to Facebook.
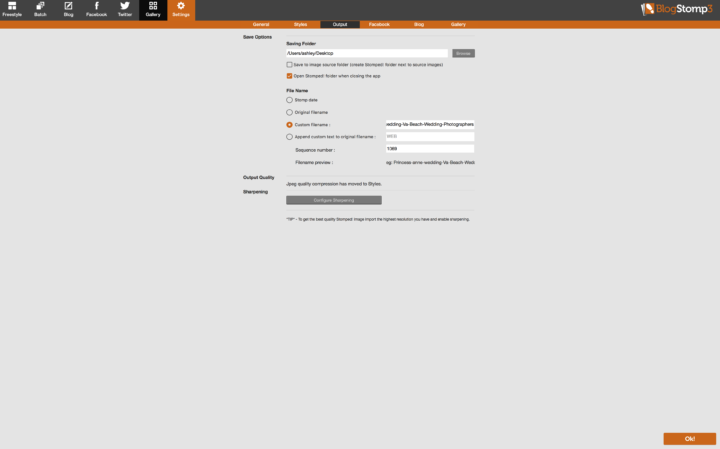
- Output- Next head to the output tab. In this section you will set up where your “stomp” folder will go, what to rename your images and how much sharpening you want on your images. We stick to the recommend sharpening of 30. Once you fill in all the details hit OK and you are ready to have some fun!
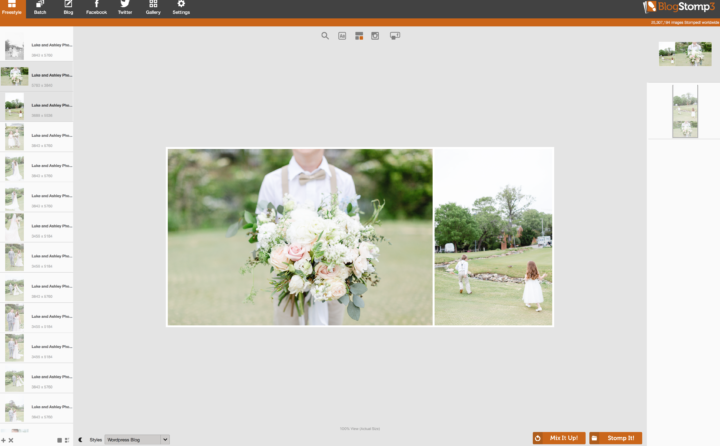
- Click On Freestyle- This is where you will be putting your images together to fit your aesthetics. This is called “stomping” You can do one image at a time or create a collage like the picture below. Once you have what you want you just click the “stomp” button. The pictures will disappear and will be in the designated Stomp folder. You can retrieve these images and post them where you wish.
This is the basics of how we use Blogstomp to optimize our images for our website and Facebook. This simple and affordable tool has saved me hours of time when it comes to blogging and is one of the best investments we have made in our business!
If your not sold yet and you have more questions please don’t hesitate to reach out! I would LOVE to help you get started on making your workflow much simpler so you can spend time doing things that you really love… just drop a comment below if you have any questions!
Until Next Time!
-Ash-
More informative post below!
4 Workflow Mistakes By Photographers